This is a continuation of my series on Cold Weather Growing.
Remember from my last post, I have 2 raised gardens, each measuring 8′ x 4′ x 22″. The one in the front has seen better days. Both were built using unpainted pressure treated lumber that was supposed to resist insects and rot. Apparently the boards on the front bed didn’t know that. I will replace the front garden this Spring (2021) with a ‘U’ shaped bed that is 10′ wide with a 3′ to 4′ walking path in the middle to give easy access to the full ‘U’ shaped bed. The existing bed provides 32 sf (square feet) of growing space. The new bed will provide at least 60 sf of growing space.
Right now, we’ve got two enclosures. The first one, shown in the background of the picture below, is 9′ x 7′ x 7′ tall. It did a good job of enclosing the garden, but being only a foot wider than the garden meant that we had to walk in the garden to get to the plants. The second enclosure, shown in the foreground of the picture below, is 10′ x 10′ x 7′ tall. That gives us 4′ of walking space on one side and 2′ of walking space on the other side so we have easy access to the garden.
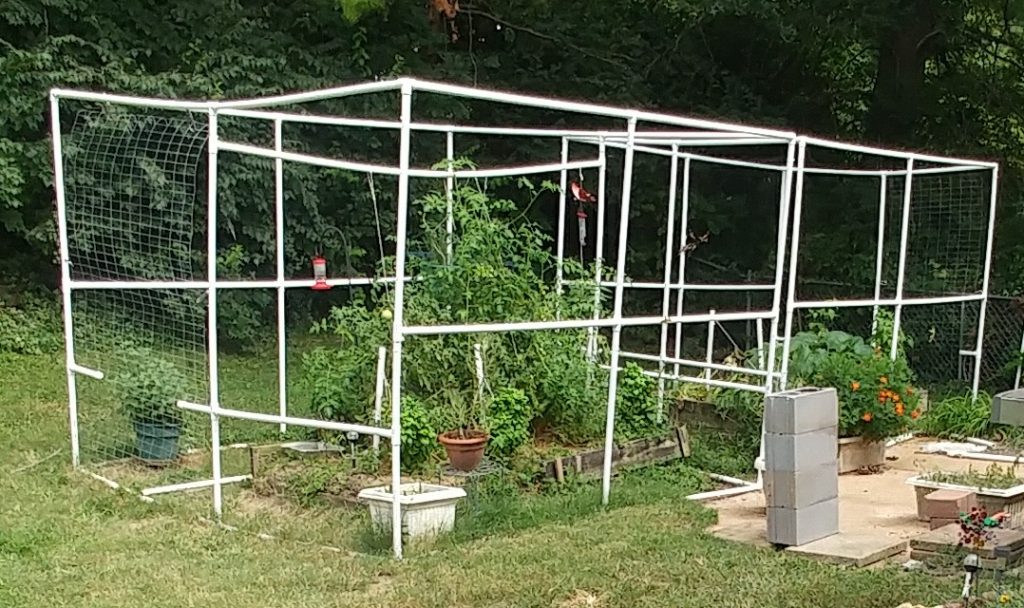
Incidentally, the white piping used in the enclosure structure is PVC pipe. Initially, we were worried that the wind would turn this thing into a kite. To combat that possibility, we filled the bottom half of the structure with water, after all, it is piping. We found that we needed to refill it about once a week because the water would leak out. Over the winter, we didn’t bother and it didn’t move, so for Summer 2021, I think we’ll just ignore it and not worry about it taking off.
While building the bigger enclosure (foreground, above), we thought that we could make it into a greenhouse for wintertime growing. The plan was to wrap the outside with clear, heavy-duty plastic, and somehow attach another layer inside the PVC pipes to create a dead-air-space, which would help insulate the inside from the outside air. The more we pursued this idea, the more we thought about it. How would we attach an inner layer of plastic. In cooler weather, the glue might not stick, and not much sticks to PVC anyway.
In the Spring (2020), before we built these enclosures, we had considered buying a greenhouse. But with the pandemic raging and produce shortages in the grocery stores, the populace considered growing their own vegetables in their backyards. Greenhouses were sold out, everywhere. I feel sorry for those backyard hobbyists that jumped into the greenhouse adventure without doing their homework.
In the Fall (2020). Looking online, most greenhouse suppliers were fully stocked again. Now, I could just buy a greenhouse and adapt it for our own needs. That seemed to be a good idea. Instead of wasting my thoughts on how to build one, I was thinking about the more important questions: how would I keep it warm? And how warm do I need to keep it?
My plan was to use an electric space heater in the greenhouse to keep it warm. The only electrical outlet in my backyard is a non-GFCI, 15-amp, circuit 50 feet from the greenhouse. Standard household wiring in the United States features 120VAC (volts AC). Watts, a measure of power, is calculated as Amps x Volts. So, for a 15-amp circuit, I have a maximum draw of 15 x 120 watts, or 1800 watts. However I choose to keep the greenhouse warm, my limit would be 1800 watts.
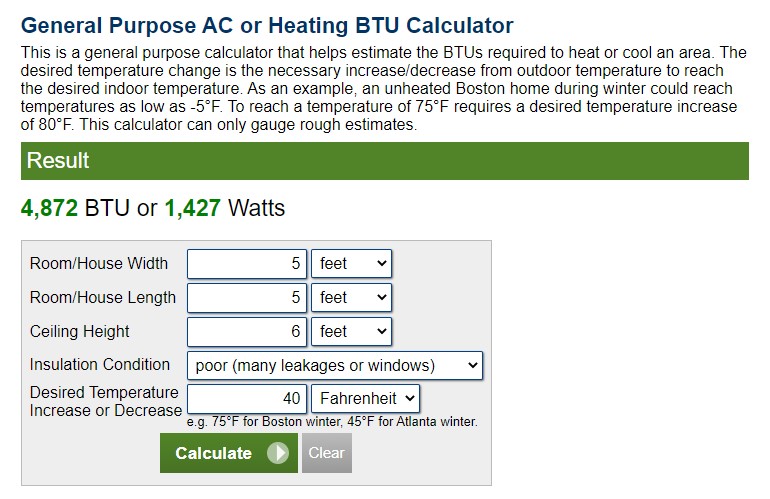
I searched for how to calculate heat required to warm a space. That brought me to the BTU Calculator, a handy website to calculate the number of BTUs required for heating or cooling a space. There are two different calculations on that page: 1) AC or 2) General Purpose AC or Heating. I wanted to use the General Purpose AC or Heating Calculator. But wait. What on earth is a BTU? I’d heard of BTUs; I knew that my portable air conditioner that I use in my office requires 10,000BTUs. But what is a BTU? I have 1800 watts. Can I convert watts to BTUs?
BTUs are a way to measure energy output. BTU, an acronym that stands for British Thermal Units, is defined as the quantity of heat required to raise one pound of distilled water, one degree Fahrenheit.
BTUs measure energy. Watts measure power. Power is defined as energy for a period of time. For example, a 100-watt lightbulb is really a shorthand way of saying 100-watts per hour, or 100-watt-hour lightbulb. By definition, 3.41 BTUs per hour = 1 watt-hour. So, that 100-watt lightbulb, actually outputs 341BTUs per hour. For my 1800 watt circuit, that’s 6,138 BTUs per hour.
Back to the BTU Calculator. My enclosure is 10′ x 10′ x 7′ tall. If I wasn’t going to just enclose the enclosure with plastic, and instead buy a greenhouse, I reasoned that I probably would want approximately the same size. This way, I’ve already got the garden beds built, and they can just be used inside the greenhouse.
The BTU calculator has inputs for width, length, ceiling height, insulation condition, and desired temperature increase over the outside temperature in degrees Fahrenheit. I refer to the desired temperature increase over the outside temperature as the delta temperature, hereinafter. I entered my data.
My enclosure is 10′ wide by 10′ long with a ceiling height of 7′. The insulation condition is poor because its uninsulated, it’s outdoors, and it lacks a floor. The desired temperature increase, or delta temperature requires some thought. What is it that I’m trying to accomplish? I want to plant lettuce, spinach, and swiss chard and keep them above freezing. I also have a few tropical plants that spend the summer on our porch, but need to be kept warm for the winter. The tropical plants need a minimum temperature of 50F (degrees Fahrenheit) preferably warmer. The vegetables grow best between 60F and 70F, but they will tolerate temperatures near freezing. I live in a western suburb of St Louis, MO, USA. The average temperatures for the winter are generally in the mid to upper 30s and low 40s. January and February can see overnight lows in the single digits or teens. I made a plan for handling temperatures as low as -8F, and keeping the inside temperature at a minimum of 50F. That means the delta temperature is 58F.
Back on the BTU calculator, I entered 58F for the desired temperature, and then clicked the Calculate button.
Uh oh. 18,513BTUs are required. That’s the equivalent of 5,425 watts. I have a maximum of 1800 watts. This was my first wake-up call.
There are other heat sources besides electric. For my calculations below, I assumed that I would be running heat for the dark hours of the day. During the winter in St Louis, that’s roughly 16 hours per day. On nice days, the sunlight keeps the greenhouse warm enough. On really cold days, it doesn’t.
Perhaps I should use….
- Natural Gas — 139,050 BTUs per gallon (1030 BTUs per cubic foot) will require running a gas line to the greenhouse at a cost of a few thousand dollars, then must buy a gas-company-approved gas heater and have it professionally installed…..still more $$$.
- Propane — 91,500 BTUs per gallon. A 1lb bottle of propane (21,500BTUs) costs $4 at Walmart or $6 at Bass Pro Shop in 2020. With a requirement of 18,513BTUs per hour, that could cost up to $55 per day (nearly one 1lb bottle every hour for 16 hours at $4 each). Using a 20lb gas grill tank, which contains 4.6 gallons of liquid propane (LP) (costs $21 for exchange) could cost up to $15/day (16 hours per day). Most small propane heaters do not have or support temperature specific thermostats to turn them on or off. I cannot install a 100-gallon pig in my yard. But even if I could, it would only last 21 days.
- Gasoline — It’s explosive. I don’t need a 50-gallon drum of gasoline on my property. Gasoline has a flashpoint — the point at which it becomes a vapor — of just -42F. Yeah, that’s minus 42 degrees Fahrenheit. One spark and its bye bye back yard and house.
- Kerosene — 132,000 BTUs per gallon. Kerosene 2-K is really sooty with up to 3000ppm (parts per million) of sulfur. Kerosene 1-K is still fairly sooty with up to 400ppm of sulfur. It’s cheaper than propane, has 44% more BTUs per gallon than propane, but at $23/day, it’s still expensive. One gallon of 1-K kerosene at Lowes costs about $10. One gallon of 1-K kerosene at Menards is about $7.50. One gallon of 2-K kerosene at a local gas station is about $4. Avoid 2-K kerosene. It’s dirty, stinky, nasty.
- ULS Diesel (ULSD or Ultra Low Sulfur Diesel) — 139,000 BTUs per gallon. ULSD contains less than 20ppm of sulfur. Diesel fuel sold at Shell stations contains less than 7ppm of sulfur. This is just about the cleanest fuel you can find. As of this writing, my local Shell station sells ULS Diesel fuel for $3.17/gallon. Diesel fuel burns 18% cooler than kerosene. This means that in similar appliances, diesel will burn longer on a tank of fuel than kerosene will on the same sized tank. That also means that in the time that it takes for kerosene to release 132,000 BTUs, diesel fuel will only release 114,000 BTUs. I still cannot use a remote thermostat to determine when to turn the heater on and off. Most small heaters don’t support that feature and I don’t need a heater that will produce 250,000 BTUs per hour.
Clearly, if I was a professional grower, and this was a business rather than a hobby, the correct solution would be to pay an installer to install a natural gas line to the greenhouse and a small, 50,000 BTU per hour heater. But for my purposes, these options are all on the really expensive side. I could also install another electrical circuit, but my circuit breaker box in the basement is maxed out, so not only would a new line cost hundreds of dollars, a 2nd breaker box would cost a few hundred more.
My solution? Buy a smaller greenhouse.
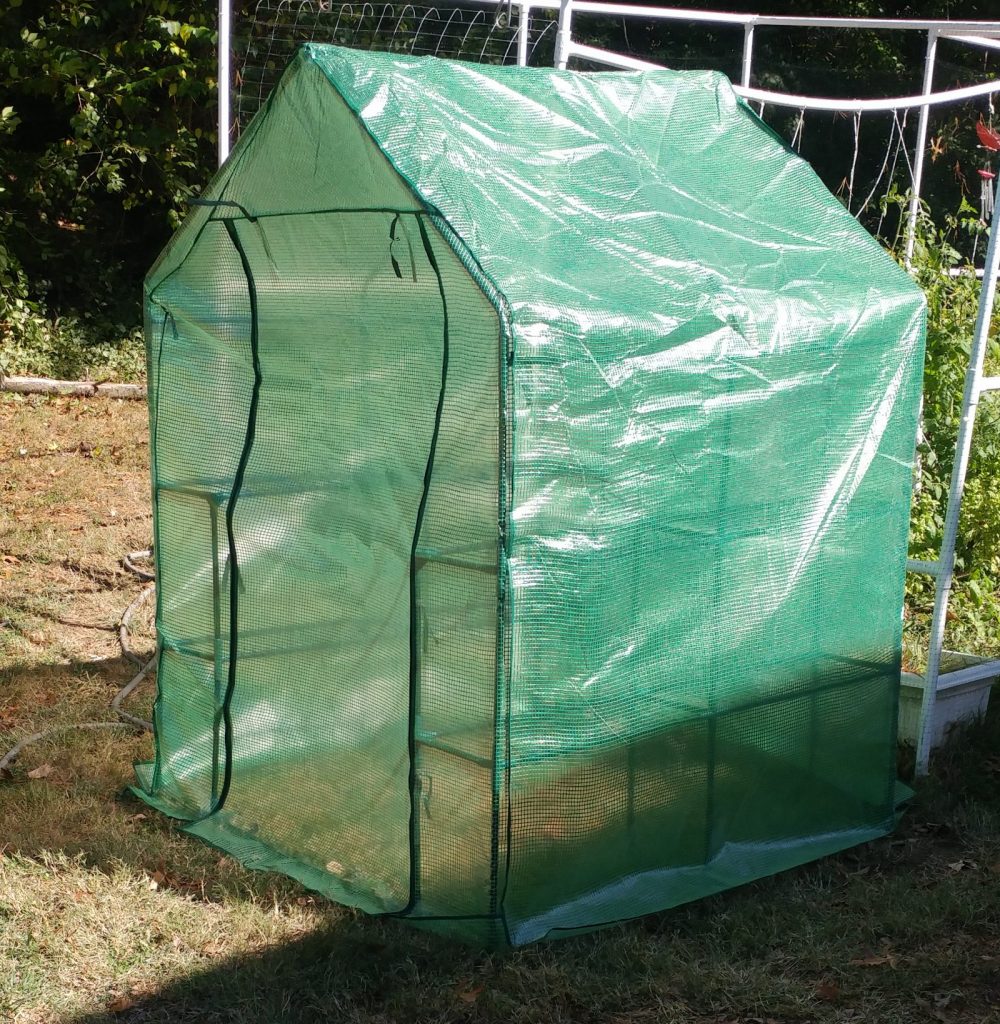
After many iterations, I selected a 57″ x 57″ x 77″ center height polypropylene PE greenhouse on Amazon for $65. That’s 4′ 9″ x 4′ 9″ with a center peak height of 6′ 5″. For round numbers, and for calculating heating requirements, I used 5′ x 5′ x 6′, or about 150 cubic feet, although, truthfully, it’s only about 125 cubic feet. The BTU Calculator shows that I would need 1,427 watts to maintain a delta temperature of 40F. So if the outside temperature were -8F, I could maintain an inside temperature of 32F. Certainly not ideal, but what other choice do I have?
While I was waiting for the greenhouse to arrive, I searched the Internet for what space heater to use with it. My requirements were simple: 1500 watts, safe to leave running unattended, and a built-in thermostat which I could set the precise temperature that I wanted. I found the Vornado 1500-watt ceramic space heater recommended on multiple greenhouse websites, so I ordered one. Don’t make the same mistake I did. Don’t buy one of these. In my greenhouse and in my home’s foyer, it was worthless, and I returned it to Amazon. More on how I arrived at that conclusion in the next post.
The greenhouse arrived. I thought I was ready. The assembly instructions left a lot to be desired, but with a bit of patience and some luck, I managed to assemble it in about 2 hours — even though there were some parts left over, and others that were missing. I picked a particularly sunny spot in my yard on one end of the largest enclosure. The parts meant to secure it to the ground were a joke, so I used some 12″ galvanized steel tent stakes, with 2 blades, instead. Many reviews on Amazon comment about how their greenhouses were destroyed by heavy wind and bad weather. With a bit of attention to detail, like the addition of concrete blocks on the flaps and heavy duty tent stakes, my greenhouse has withstood many storms including lots of wind and even wind gusts above 60mph.
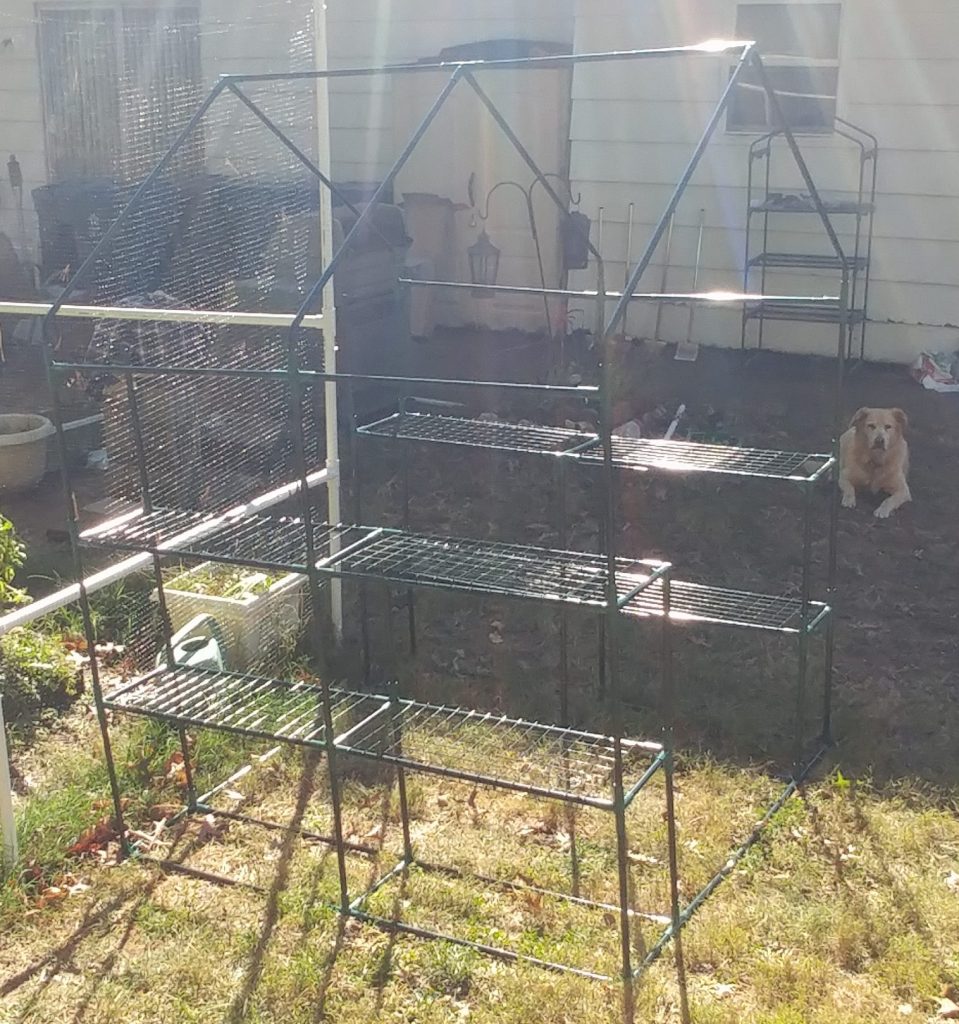
The greenhouse has flaps at the base of all of the sides. I placed concrete blocks on the flaps to help hold it down and keep the air inside, inside and the air outside, outside. My greenhouse is solid. The wind doesn’t bother it at all.
The first night after I assembled it, I put one plant inside, and a thermometer which records the highest and lowest temperature and humidity since it was last reset. Throughout this greenhouse adventure, this thermometer has been my most important tool. I can reset the high and low temperatures by simply removing the battery for a few seconds. I closed up the greenhouse and left it for 24 hours.
I monitored the outside temperature closely throughout the overnight and the next day. The next afternoon, I opened the greenhouse and checked the thermometer. The outside temperatures had gotten down to 39F overnight night and had gotten up to 51F in the late afternoon during, this, the last week of October, 2020. The thermometer inside the greenhouse recorded an overnight low of 39F and a daytime high of 135F. Uh oh. Up until that very moment, I had been worried about the overnight low temperatures. I had never considered that the daytime high temperatures would fry the plants inside. The simple answer is to open the zippered door during the hot part of the day. But what if I’m not home to open it, or close it again after the sun goes down? What if the outside temperature is 20F? Letting a lot of 20F air into the greenhouse would not be good for the plants inside. Maybe it won’t get so warm in the afternoon sun when the outside temperature is in the 20s. Yeah, right. Not.
Clearly, I would have to address this afternoon heating problem. But for now, I have Greenhouse 1.0 set up. I have a space heater to keep it warm. During the daytime, I can keep the door open to help cool the interior. But, I will have to wait until I address the afternoon heat problem before I can plant our vegetables.
In the next article, I will talk about the next steps. Why didn’t the Vornado space heater work? What did I do instead? What did I do to deal with the daytime high temperatures? When can I plant?
© 2021, PaulSwarthout. All rights reserved.